This article explains how to use PageCarton's Access Level Widgets to control content visibility based on user roles, such as content owners, invited users, or administrators. It helps ensure that only authorized users can manage or modify content, thereby improving both usability and security across your website.
Understanding Access Levels
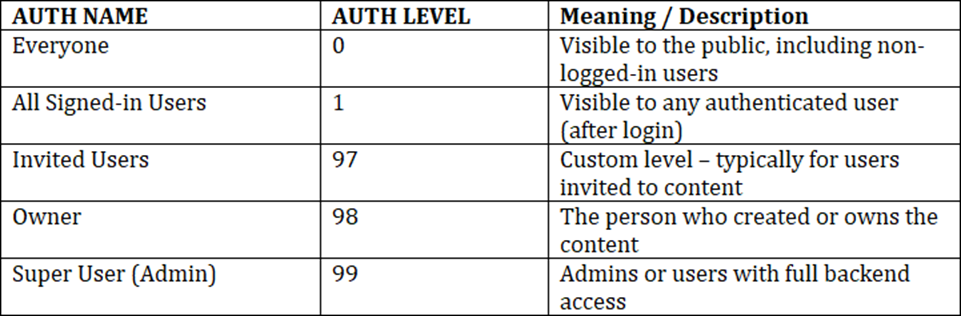
Access levels determine who can see what is on your website. It's important to define which user should be allowed to view the content. Numerical values called AUTH LEVELS are being used to represent different types of users.
Here are the standard access levels commonly used:
Example Use Case:
- If you only want owners and super users to be able to edit or delete a post, use
object_access_level: [98, 99]
- If you want all signed-in users to see a button (e.g., 'Comment'), use
object_access_level: [1]\
PageCarton Access Level Widget
This ensures proper visibility control, and also enhances the security of your site by making sure that only users with the appropriate permissions such as the content Owner (98) or Super User (99) can view and interact with these sensitive actions.
Without access control, unauthorized users might see or attempt to perform actions they shouldn't have access to, which can lead to errors or vulnerabilities. Wrapping your content in an access-level condition provides a clean, secure, and professional experience for all users.

- <widget> If it is not to be used inside another widget.
- <widget-inner> If it is to be used inside another widget.
- object_access_level: Limits visibility to users listed.
Example: To Hide an Edit Button from Users and make it visible for website Owner and Admin only.
This ensures that only users with the appropriate roles such as the Owner (98) or Admin (99) can see and interact with the button.

Why This Matters:
By defining and using access levels:
- You keep sensitive actions secure.
- You improve the user experience by showing only relevant actions to each user.
- You avoid cluttering the interface for general visitors.